The Battle of Arnhem through the eyes of the German commander Walter Harzer
From the British side, many personal accounts have been written in which soldiers describe their experiences during the Battle of Arnhem. Much less attention is paid to the Battle of Arnhem through German eyes.
Below is the story of the German Colonel Walter Harzer. Harzer was commander of the 9th SS Division Hohenstaufen and played an important role in defeating the British at Arnhem.
Harzer was one of the first protagonists to put his experiences in Arnhem on paper. At the request of the American army, Walter Harzer wrote an extensive report in 1956 describing the Battle of Arnhem through German eyes. It is a pure and objective representation of the facts.
Harzer corresponded with the Dutch historian Theodoor Boeree
In addition, Harzer corresponded extensively with the Dutch (amateur) historian Theodoor Boeree. Immediately after the war, Boeree began meticulously reporting the events in Arnhem. The story below is a summary of these two sources.
The story of Water Harzer begins with a phrase that is also used in many British accounts when it comes to Sunday, September 17, 1944, the day of the airborne landings: “It was a brilliant day.”
While an armada of British aircraft is en route to Arnhem, Harzer is in Hoenderloo. There he presents an award to the German Major Viktor Graebner. “We were on our way to the officers’ mess for lunch when we saw paratroopers in the distance. At first we thought that this was about the crew of bombers that had been shot down. That was a common sight at the time.”
Soon Harzer receives the message that there is more to it. “There was an alarm that large numbers of enemy paratroopers had landed west of Oosterbeek.”
All German units of the 9th and 10th SS Panzer Division stationed around Arnhem come into action. Viktor Graebner’s unit, with about 30 armored cars, is sent to Nijmegen.
“We had heard from the German army command that large numbers of enemy paratroopers had landed not only west of Arnhem, but also near Nijmegen. Graebner’s unit was ordered to occupy the Waal Bridge near Nijmegen and to prevent the convergence of enemy soldiers who had landed at Arnhem and Nijmegen.”
Graebner drives over the Rhine bridge to Nijmegen
Graebner’s column of armored cars drives over the Rhine bridge to Nijmegen around 6 p.m. Here the story of Walter Harzer deviates from the official (British) historiography. John Frost’s battalion reached the Rhine bridge around 8 p.m. that evening, but according to Harzer, groups of British soldiers are already present at the bridge around 6 p.m.
“Shooting from all holes, Graebner drove across the bridge. The northern ramp of the bridge was already occupied by a small number of British soldiers at this time. They were in houses on either side of the driveway. There were no losses because the British only had light infantry weapons.”
According to Harzer, the Arnhem city center is crawling with British soldiers around 6 p.m. These are small, isolated groups. Characteristic is this anecdote from Harzer:
“When the British paratroopers arrived in Arnhem, the situation was very chaotic. The British did not meet much resistance. In the Wehrmachtsheim (Musis Sacrum) about 80 German soldiers were drinking coffee and playing cards. Their weapons leaned against the wall. A handful of British paratroopers walked in and ordered the German soldiers to raise their hands. Then they drank a cup of coffee and left.”
German defense in order
From the moment the airborne landings begin, the Germans, improvising, do everything they can to stop the British advance. At the beginning of the evening there is a defensive position between Oosterbeek and Arnhem that is strong enough to stop the British.
Soon there is more line in the German defense. At nine o’clock in the evening on Sunday, September 17, 1944, Harzer received the order to defeat all the British on the north side of the Lower Rhine with his division. With a strong line of defense on the west side of Arnhem, Harzer orders his troops to clear Arnhem itself first.
“In the night of September 17 to 18, isolated enemy pockets of resistance in the city center of Arnhem are cleared. That night traffic through Arnhem is only possible in armored vehicles. Ordinary cars are attacked by the British. By the morning of September 18, the inner city has been cleared of Britons. Some have surrendered and some have gone into hiding with people in Arnhem.”
The fact that John Frost’s battalion nevertheless has a firm grip on the north side of the Rhine bridge is a setback for Harzer.
“Despite the German Sperrlinie, the enemy succeeded in reinforcing the garrison at the bridge with troops, grenade launchers, heavy weapons and anti-tank guns.”
That night, reinforcements, including tanks, were sent to Arnhem by Field Marshal Walter Model from Emmerich.
“Due to these reinforcements, the strength of Kampfgruppe Harzer (9th SS Panzer Division) is about 3,500 men.”
Battle on September 18 and 19
On the morning of Monday, September 18, Viktor Graebner’s armored unit tries to break through the British lines from the south over the Rhine bridge. The entire column is destroyed on the bridge. The Germans underestimated the strength of the British defenders. Several German attacks with ground troops from the east side of the bridge are also repelled by the British.
“Attacks on the bridge face very stiff resistance. Because the enemy is entrenched in the houses, no progress can be made with infantry alone. Because the German barrier line on the west side of Arnhem is now complete, the British can no longer get reinforcements at the bridge. So it can be counted on that the battalion’s supply of ammunition at the bridge will soon run out.”
Field Marshal Walter Model has meanwhile ordered the 10th SS Panzer Division to defeat John Frost’s battalion at the Rhine Bridge. Harzer’s 9th SS Panzer Division can fully focus on the British paratroopers west of Arnhem.
“Through new strong attacks, the British are making another attempt to reach the trapped British units at the bridge. This shows that it is important for the British to keep control of the bridge.”
Harzer meanwhile receives new reinforcements, but he is not very happy about that.
“There is a group of Arbeitseinsatz between the reinforcements: they are boys aged 16 and 17. Most reinforcements have little combat value. It’s ground crew and naval crew. Even the officers have no front experience.”
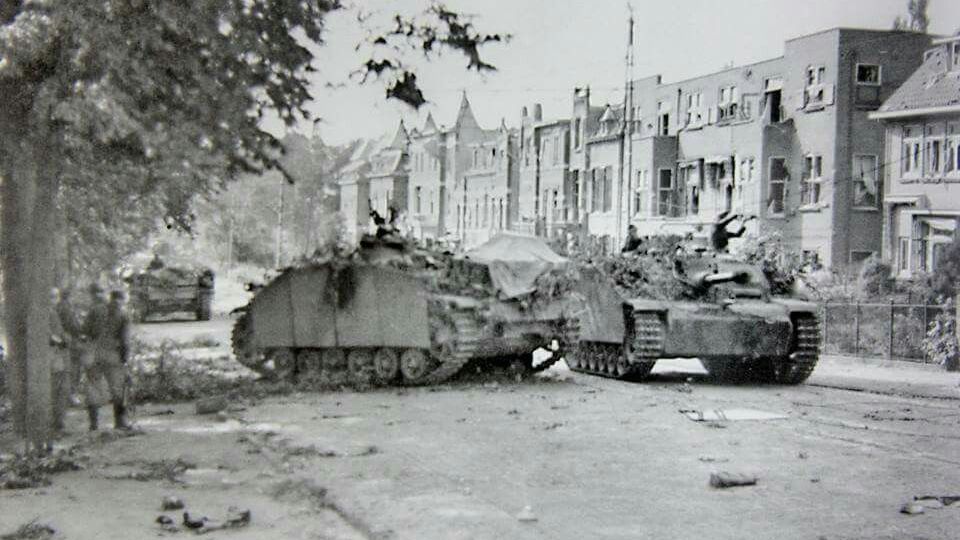
Nevertheless, Harzer manages to repel the British attacks via the Onderlangs and the Utrechtseweg and to drive the British back to Oosterbeek. He is helped by Stug armored vehicles that have been sent to Arnhem via flash transports.
Battle around the British perimeter in Oosterbeek
From that moment on there are no longer any British attacks in the direction of the Rhine bridge. It is Harzer’s troops who go on the offensive.
“On September 20, in the course of the afternoon, a concentrated attack took place from the east in Oosterbeek. Despite the support of tanks and artillery, the British respond with strong fire. The British defended valiantly and dogged their well-developed positions.”
“In the late afternoon, with the help of tanks, they manage to conquer entire streets from the British soldiers and to make a significant dent in the British defense line on the east side. The British also attacked from the north. The infantry often fought there with bayonet on their guns. Here too we managed to gain ground, but there were heavy losses on both sides.”
“The territory that was captured from the British during the day was partly recaptured by the British at night during night attacks by shock troops.”
Harzer has meanwhile received reinforcements from a number of mortar and artillery units. He orders them to harass the British continuously, 24 hours a day.
“That way, the British soldiers don’t get a moment’s rest.”
Polish landing
The Germans are surprised when on Thursday, September 21, part of the Polish parachutist brigade lands on the south side of the Nederrijn near Driel.
“Due to concentrated fire from German Flak batteries, the Poles suffered heavy losses on landing.”
Harzer is wrong here, by the way. The Polish landing went smoothly without major losses.
The Germans suspect that the Polish airborne landing serves two purposes: to strengthen the British positions in Oosterbeek and to establish a connection with the Allied ground troops who have meanwhile crossed the Waal near Nijmegen.
Because the 10th SS Panzer Division has already captured the Rhine Bridge, German troops can be sent directly to Driel to stop the Poles.
“Because the dike at Driel was actually the only road that could be used by tanks, it was not possible to use tanks. The tanks would be destroyed immediately. Otherwise it would probably have been possible to destroy the Polish paratroopers before sunset, even with troops without combat experience.”
“Because German troops had captured the jetty of the Driel ferry on the north side of the river, few Poles were able to cross the Nederrijn that night to reinforce the British lines.”
Text continues under this text/photo block
If you are interested in the Battle of Arnhem, do come and visit the city and it’s surrounding towns like Oosterbeek and Wolfheze yourself!
We offer various Battlefield tours and work with local guides who have a great passion for sharing the story of the Battle of Arnhem. Along with eyewitness stories and photos taken during the Battle of Arnhem, you’ll get a good idea of what happened in Arnhem in September 1944.
Please take a look at some reviews on Google that our cliens wrote about the tour and our services.
Armistice Day
Due to the Polish landings and the advance of the Allied ground troops, the pressure on Harzer is increasing to deal with the British bridgehead on the north side of the Lower Rhine.
“Field Marshal Walter Model visited my headquarters every day. He felt that too little progress had been made in defeating the British in Oosterbeek. At the same time, he showed understanding that fighting an elite British division took more time.”
“On Friday, September 22, the British hedgehog position in Oosterbeek was attacked from four sides. The main target was hotel Hartenstein. By nightfall the British had been pushed back to an area of two by two kilometers. However, they still defended themselves extremely stubbornly. Loudspeaker calls to surrender were met with mortar rounds.”
Despite the heavy fighting and the pressure on Harzer by Field Marshal Model to make short work of the British, Walter Harzer single-handedly decides to call an armistice.
“From a British radio message, we understood that the British dressing stations were full of seriously injured people and that there were no bandages left. On my orders, Staff Physician Dr. Skalka then drove to the British emergency hospital on Utrechtseweg to speak with the British divisional doctor Colonel Warrack about taking over the wounded.”
During a three-hour truce, 450 British wounded are then taken to the Elisabeth Gasthuis. British and German doctors have been working there together since the beginning of the fighting.
“The Elisabeth Gasthuis was used by the British at the start of the fighting for the care of wounded soldiers. The hospital was now well behind the German lines, but the medical management remained in the hands of the British doctors.”
British General Urquhart wrote a letter to Walter Harzer after the war, expressing his appreciation for the decision to evacuate the British wounded.
“Many British ex-soldiers must still be alive because of your humane decision to evacuate British wounded to the Elisabeth Hospital during the rather unusual ceasefire. I thank you for that.”
Someone less enthusiastic was Field Marshal Walter Model.
“What the hell were you thinking?” he snapped at Harzer.
Final chord
By now it was clear that the remaining remnants of the 1st British Airborne Division, some 3,000 strong, were at the end of their tether. Almost all supplies that were dropped in Oosterbeek with supply flights with parachutes ended up in the hands of the Germans.
“I hardly slept those days, but we did eat luxuriously. The looted supplies gave me things I hadn’t had for years, like chocolate and coffee. The British position was now so small that it was impossible for the RAF to drop supplies into the British sector. The few supplies that did land within the British hedgehog position could hardly be secured. Due to German mortar attacks it was life-threatening.”
While the Poles in Driel had been reinforced by Allied ground troops and British tanks on the south bank of the Nederrijn were able to reduce the pressure on the British in Oosterbeek, the fighting continued unabated.
In the meantime, the Allies had decided to withdraw the British across the Nederrijn, but the Germans did not know that.
“On the night of September 25 to 26, shortly after midnight, we heard a lot of engine noise on the south bank of the river. Initially it was assumed that the Allies would try again to put reinforcements across the Lower Rhine, but it was soon reported that troops were being transferred from the north to the south.”
“So the British had decided to give up their expensive bridgehead on the north side of the Lower Rhine. In the night the Germans attacked the British positions, but it was amazing how strong the resistance was. It was suspected that many British soldiers were sacrificed to cover the retreat.”
“By morning, German units on the west and east sides of the British position on the Lower Rhine managed to link up. Any British troops still north of the river at the time were trapped. Finally, by 9 o’clock that morning, the violence of the war had subsided.”
After the Battle of Arnhem
“British and Poles were captured and what was left behind was an incredible amount of spoils of war. Heavy weapons, vehicles and all kinds of other war material had been left behind in Oosterbeek. The retreat was so hasty that nothing was broken.”
That morning Harzer drove around Oosterbeek in a captured jeep.
“I drove slowly on the long road from Arnhem to Oosterbeek. There were large trees on both sides of the road. These were scarred and torn by bullets. Many houses were damaged.”
“Hartenstein was in the worst shape. It looked terribly gloomy and deserted. The ground around it had been plowed. I went in where it looked even worse. There were still bodies in the basement. The place smelled really bad. The remains of medical supplies were still there. There was so much rubble, broken glass, splintered beams. It made a huge impression on me.”
“After a report was broadcast on German radio that 8,000 British soldiers had been captured at Arnhem and 1,500 British had been killed, Prime Minister Winston Churchill told the BBC that those figures were grossly exaggerated. According to him, more British were captured than were deployed in total.”
Harzer was then instructed by the German army command to check the figures one more time.
“I have done that. It turned out that the figures I had initially submitted were correct. In fact, it was even slightly higher than I had previously said.”
“What I am proud of is that this victory was not achieved by regular units, but also by railway workers, Arbeitsdienst and Luftwaffe personnel. These are people who were never trained for infantry work and were actually unfit for house-to-house fighting.”
The Battle of Arnhem was the last German victory of World War II. For his role in defeating the British, Walter Harzer was awarded the Knight’s Cross.
Origional text content by Patrick Arink at http://www.slag-om-arnhem.nl/

